All Stories

Monday, 15 July 2013

Social Widget is common thing if you place like this it attractive and looking professional when visitor will see it must click on it to see what is there in side of this so main thing i design it on HTML so it is easy to install any one can install it. 

Step 1

Go To Blogger Layout.
Add HTML/Java Widget.
And Paste Below Code In It.


<center><a href="https://www.facebook.com/insuranceandeducation" target='blank'><img border='1' src="https://blogger.googleusercontent.com/img/b/R29vZ2xl/AVvXsEj9bzz3qdqxlYptRK5E-VjZuNumE09paqK_8idHuUVoax7gMdUAOZ_GEpSgkCcgrr8P2bsuvXGtLQnu_eIsuJxMZeCHydN2xhPeLBDg34GQ981enT1qVw_LHsNItLcH5Q-DtsYJFd3IyfQ/s1600/fb.jpg" /></a><a href="https://twitter.com/rashidminhaj" target='blank'><img border='1' src="https://blogger.googleusercontent.com/img/b/R29vZ2xl/AVvXsEhzH481UtPgHMAw7V69MSRWI-8zc3Hl0GT8AUg6c9cVlClf8hRL6spsJfjrLd59eOvEDKsSgw8y5iogpWaKhV1DxeJyWkTr7n-86fzWq0Q8MDe2pZH-y-dcGIx1ZSWf24IGwuKgr6DhWQE/s1600/twitter.jpg" /></a>
    <a href="https://plus.google.com/googleid" target='blank'><img border='1' src="https://blogger.googleusercontent.com/img/b/R29vZ2xl/AVvXsEg1oUfhzzMIEMJOgjOWQ8Kin_wCSahc052QNvbEKO60s93Q56q6H_6KsaOXYV9K7fHRmmsqvBVp0QkYAJf8RuxEAQe9z7ctKVZFIrJ9qYhM7ixkZhB0sExLHVDA14WmN30Y5qf5Naji70I/s1600/g+.jpg" /></a>
<a href="http://feedburner.google.com/fb/a/mailverify?uri=edurashid" target='blank'><img border='1' src="https://blogger.googleusercontent.com/img/b/R29vZ2xl/AVvXsEi7j_wdwQ4OBv1a241F0bTxF5PY6boGqoO2m7R5RTmKul-OPlJincv0RwIlro2UEu43DrQYQZ9lk33VsObVDF0crH2W0RWiMBnOp1TJZ49cowzJDxogFOiQme5st1XUw-LpOqF1U9f1Nho/s1600/rss.jpg" /></a></center><center><a href='http://edurashid.blogspot.com/2013/07/beautiful-social-sites-sharing-widget.html' target='blank'>Get This Widget<a/><center>


You need to change following id,s.
If you want to add your Facebook Page replace it insuranceandeducation
If you want to add your Twitter Username replace it rashidminhaj
If you want to add your Google+ Id replace it googleid
If you want to add your FeedBurner Id replace it edurashid

Note:
If you find any problem regarding'Beautiful Social Sites Sharing Widget'then feel free to comment below.

Beautiful Social Sites Sharing Widget

Social Widget is common thing if you place like this it attractive and looking professional when visitor will see it must click on it to see what is there in side of this so main thing i design it on HTML so it is easy to install any one can install it. 

Step 1

Go To Blogger Layout.
Add HTML/Java Widget.
And Paste Below Code In It.


<center><a href="https://www.facebook.com/insuranceandeducation" target='blank'><img border='1' src="https://blogger.googleusercontent.com/img/b/R29vZ2xl/AVvXsEj9bzz3qdqxlYptRK5E-VjZuNumE09paqK_8idHuUVoax7gMdUAOZ_GEpSgkCcgrr8P2bsuvXGtLQnu_eIsuJxMZeCHydN2xhPeLBDg34GQ981enT1qVw_LHsNItLcH5Q-DtsYJFd3IyfQ/s1600/fb.jpg" /></a><a href="https://twitter.com/rashidminhaj" target='blank'><img border='1' src="https://blogger.googleusercontent.com/img/b/R29vZ2xl/AVvXsEhzH481UtPgHMAw7V69MSRWI-8zc3Hl0GT8AUg6c9cVlClf8hRL6spsJfjrLd59eOvEDKsSgw8y5iogpWaKhV1DxeJyWkTr7n-86fzWq0Q8MDe2pZH-y-dcGIx1ZSWf24IGwuKgr6DhWQE/s1600/twitter.jpg" /></a>
    <a href="https://plus.google.com/googleid" target='blank'><img border='1' src="https://blogger.googleusercontent.com/img/b/R29vZ2xl/AVvXsEg1oUfhzzMIEMJOgjOWQ8Kin_wCSahc052QNvbEKO60s93Q56q6H_6KsaOXYV9K7fHRmmsqvBVp0QkYAJf8RuxEAQe9z7ctKVZFIrJ9qYhM7ixkZhB0sExLHVDA14WmN30Y5qf5Naji70I/s1600/g+.jpg" /></a>
<a href="http://feedburner.google.com/fb/a/mailverify?uri=edurashid" target='blank'><img border='1' src="https://blogger.googleusercontent.com/img/b/R29vZ2xl/AVvXsEi7j_wdwQ4OBv1a241F0bTxF5PY6boGqoO2m7R5RTmKul-OPlJincv0RwIlro2UEu43DrQYQZ9lk33VsObVDF0crH2W0RWiMBnOp1TJZ49cowzJDxogFOiQme5st1XUw-LpOqF1U9f1Nho/s1600/rss.jpg" /></a></center><center><a href='http://edurashid.blogspot.com/2013/07/beautiful-social-sites-sharing-widget.html' target='blank'>Get This Widget<a/><center>


You need to change following id,s.
If you want to add your Facebook Page replace it insuranceandeducation
If you want to add your Twitter Username replace it rashidminhaj
If you want to add your Google+ Id replace it googleid
If you want to add your FeedBurner Id replace it edurashid

Note:
If you find any problem regarding'Beautiful Social Sites Sharing Widget'then feel free to comment below.

Posted at 05:58 |  by Unknown

Sunday, 14 July 2013

I am sharing you  today how to add comment box in blogger and any site via HTML gadget.Its another interesting gadget let suppose some people dont comments in your comments box so it will new for visitor when they will see facebook comments box must they will put some comments so follow my instruction and first see demo pic.


Now go to to facebook developers .
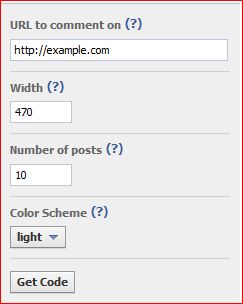
Then put your url , chose width and number of post what you want then hit get code.


Now after get code one window will appear like below .


There will be two code box just copy first code from the above then go Blogger Dashborad >>Template>>HTML now find <body> tag and paste above 1st one code after <body>.Next look another 2nd code and copy that and go to <<add a gadget>>add HTML JavaScript box and paste that 2nd code and drag and drop this gadget where you want to place .

 If you like this post must share or comments and need any help feel free ask question bellow i love to help other and also love to teach some thing new ...

Add Facebook Comments Box In Blogger And Any Site.

I am sharing you  today how to add comment box in blogger and any site via HTML gadget.Its another interesting gadget let suppose some people dont comments in your comments box so it will new for visitor when they will see facebook comments box must they will put some comments so follow my instruction and first see demo pic.


Now go to to facebook developers .
Then put your url , chose width and number of post what you want then hit get code.


Now after get code one window will appear like below .


There will be two code box just copy first code from the above then go Blogger Dashborad >>Template>>HTML now find <body> tag and paste above 1st one code after <body>.Next look another 2nd code and copy that and go to <<add a gadget>>add HTML JavaScript box and paste that 2nd code and drag and drop this gadget where you want to place .

 If you like this post must share or comments and need any help feel free ask question bellow i love to help other and also love to teach some thing new ...

Posted at 05:21 |  by Unknown

Saturday, 13 July 2013

Html-CSS-Javascript code you can post with out back ground as plan text but its look better then that because your visitor when will see and will be know back grounded color is all coding. i know you wanna see live demo of  how will look after this coding apply see below screen shot.


Now got to blogger dashboard>>>>>Edit HTML>>>>>>>>>>
Now find this below code.

<b:skin>

A now expand  above code to click on left side  small arrow .
Now Find .

]]></b:skin>

Now copy below all codes and past it above which you find skin code after expand .

.post blockquote {
background: #C8EFFF url(https://lh4.googleusercontent.com/-A-bHiDpJJDQ/UOUZM15D_OI/AAAAAAAAAhQ/DfDswKeB_Kc/w497-h373/1.png);
background-position:top left;
background-repeat:repeat-y;
margin: 0 20px;
padding: 10px 20px 10px 45px;
border-top: 2px solid #DDD;
border-right: 5px solid #666;
border-left: 2px solid #DDD;
border-bottom: 5px solid #666;
font-size: 0.9em;
}
.post blockquote p {
margin: 0;
padding: 0 0 15px;
}
.blockquote {
font: 18px normal  sans-serif,Tahoma;
padding-top: 10px;
margin: 5px;
text-indent: 65px;
}
.blockquote div {
display: block;
padding-bottom:10px;
}
.blockquote p {
margin: 0;
padding-top:10px;
}

You can change background colour just replace background color code with yours. If it is Useful or helpful  for you then it will be others so dont hesitate to share and like and comments . or need any help from me most welcome any time just leave your comments or add me on facebook.

How TO Add HTML-CSS-Javascript Codes in Blogger Post As Plain Text

Html-CSS-Javascript code you can post with out back ground as plan text but its look better then that because your visitor when will see and will be know back grounded color is all coding. i know you wanna see live demo of  how will look after this coding apply see below screen shot.


Now got to blogger dashboard>>>>>Edit HTML>>>>>>>>>>
Now find this below code.

<b:skin>

A now expand  above code to click on left side  small arrow .
Now Find .

]]></b:skin>

Now copy below all codes and past it above which you find skin code after expand .

.post blockquote {
background: #C8EFFF url(https://lh4.googleusercontent.com/-A-bHiDpJJDQ/UOUZM15D_OI/AAAAAAAAAhQ/DfDswKeB_Kc/w497-h373/1.png);
background-position:top left;
background-repeat:repeat-y;
margin: 0 20px;
padding: 10px 20px 10px 45px;
border-top: 2px solid #DDD;
border-right: 5px solid #666;
border-left: 2px solid #DDD;
border-bottom: 5px solid #666;
font-size: 0.9em;
}
.post blockquote p {
margin: 0;
padding: 0 0 15px;
}
.blockquote {
font: 18px normal  sans-serif,Tahoma;
padding-top: 10px;
margin: 5px;
text-indent: 65px;
}
.blockquote div {
display: block;
padding-bottom:10px;
}
.blockquote p {
margin: 0;
padding-top:10px;
}

You can change background colour just replace background color code with yours. If it is Useful or helpful  for you then it will be others so dont hesitate to share and like and comments . or need any help from me most welcome any time just leave your comments or add me on facebook.

Posted at 23:55 |  by Unknown

Friday, 12 July 2013

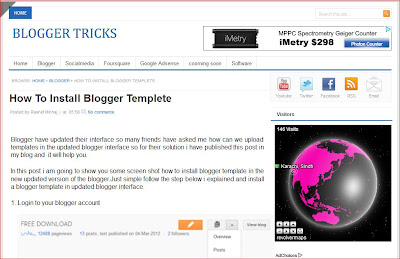
Well  i am sharing with you some thing amazing things. Blogger now changed interface its very simple if you will  install in word press and others then you have to pay money but i am sharing you free of cost Tutorial look my blog picture below you can make to like this.
Well  i am sharing with you some thing amazing things. Blogger now changed interface its very simple if you will  install in word press and others then you have to pay money but i am sharing you free of cost Tutorial look my blog picture above you can make to like this.

Blogger have updated their interface so many friends have asked me how can we upload templates in the updated blogger interface so for their solution i have published this post in my blog and  it will help you. 

In this post i am going to show you some screen shot how to install blogger template in the new updated version of the blogger.Just simple follow the step below i explained and install a blogger template in updated blogger interface.

1. Login to your blogger account


 2. Now just select Template and you can see bellow button at the right hand side.


3. Now just click on backup / restore button and one box will  open in pop up (you can see it in bellow snapshot).


4. Now simply browse your template xml file and click on upload and you have done !
You can also change the arrangement of the widgets using layout. 

Next post will be about where can you get amazing premium template  free of cost.

If you want to learn more subscribe through your email below and must share this post Thanks.....
 

How To Install Blogger Templete

Well  i am sharing with you some thing amazing things. Blogger now changed interface its very simple if you will  install in word press and others then you have to pay money but i am sharing you free of cost Tutorial look my blog picture below you can make to like this.
Well  i am sharing with you some thing amazing things. Blogger now changed interface its very simple if you will  install in word press and others then you have to pay money but i am sharing you free of cost Tutorial look my blog picture above you can make to like this.

Blogger have updated their interface so many friends have asked me how can we upload templates in the updated blogger interface so for their solution i have published this post in my blog and  it will help you. 

In this post i am going to show you some screen shot how to install blogger template in the new updated version of the blogger.Just simple follow the step below i explained and install a blogger template in updated blogger interface.

1. Login to your blogger account


 2. Now just select Template and you can see bellow button at the right hand side.


3. Now just click on backup / restore button and one box will  open in pop up (you can see it in bellow snapshot).


4. Now simply browse your template xml file and click on upload and you have done !
You can also change the arrangement of the widgets using layout. 

Next post will be about where can you get amazing premium template  free of cost.

If you want to learn more subscribe through your email below and must share this post Thanks.....
 

Posted at 06:11 |  by Unknown

Wednesday, 10 July 2013

facebook-like-box-pop-up-one-time-widget

This widget pops up a jQuery window containing Facebook like box when new visitor arrives.That is a magic of jQuery, how ever, that didn't work in some third party blogger templates. Therefore, i saw many my friends worrying about the codes not working so i am sharing  today a very simple and more attractive pop like box which will be only used if you want to increase your Facebook likes rapidly.It will appear one time and visitor will come after 30 days or visitor will delete cookies then it will pop before 30 days. I have set the cookie refresh time to 30 days, which means that this popup box will appear again for the same visitor after 30 days. We can easily set the number of days to prompt the visitors about your Facebook Fan page. Lets go to the one step installation process.

Now got to blogger>>>>>Layout>>>>>Then ''Add  Gadget>>>>>(''Html,Javascript'')

Now copy below code.

<style>

/*
ColorBox Core Style:
The following CSS is consistent between example themes and should not be altered.
*/
#colorbox, #cboxOverlay, #cboxWrapper{position:absolute; top:0; left:0; z-index:9999; overflow:hidden;}
#cboxOverlay{position:fixed; width:100%; height:100%;}
#cboxMiddleLeft, #cboxBottomLeft{clear:left;}
#cboxContent{position:relative;}
#cboxLoadedContent{overflow:auto;}
#cboxTitle{margin:0;}
#cboxLoadingOverlay, #cboxLoadingGraphic{position:absolute; top:0; left:0; width:100%;}
#cboxPrevious, #cboxNext, #cboxClose, #cboxSlideshow{cursor:pointer;}
.cboxPhoto{float:left; margin:auto; border:0; display:block;}
.cboxIframe{width:100%; height:100%; display:block; border:0;}
/*


User Style:
Change the following styles to modify the appearance of ColorBox. They are
ordered & tabbed in a way that represents the nesting of the generated HTML.
*/
#cboxOverlay{background:#000;opacity:0.5 !important;}
#colorbox{
box-shadow:0 0 15px rgba(0,0,0,0.4);
-moz-box-shadow:0 0 15px rgba(0,0,0,0.4);
-webkit-box-shadow:0 0 15px rgba(0,0,0,0.4);
}
#cboxTopLeft{width:14px; height:14px; background:url(https://blogger.googleusercontent.com/img/b/R29vZ2xl/AVvXsEjHrYKhF2laa1gAu8tEPKiNd-WAbhhzJknDC-gX72vG3K4NW_kEhbeJHi7BSkHRUfWCOfLbzSYnHOh_hC2xHhtW73zOTsRsehwdAXcidCZdX9zeCKwuADK0dB-niKXpuhD1Z8pTauJkuYlW/h120/controls.png) no-repeat 0 0;}
#cboxTopCenter{height:14px; background:url(https://blogger.googleusercontent.com/img/b/R29vZ2xl/AVvXsEiT6EOmzyhejdk_yClcSBE9iDGt3kPr32GsX0i2rbJRzIMP8Y8dPJhXEZ784HYvuu6BDXekOqfMktGCrGJKZ0hv7Q7SCD_DRHoBC_2BmltA24Yr0DREPZ4ImjjgdBXYBbRuk0VI42XrV2g/h120/border.png) repeat-x top left;}
#cboxTopRight{width:14px; height:14px; background:url(https://blogger.googleusercontent.com/img/b/R29vZ2xl/AVvXsEjHrYKhF2laa1gAu8tEPKiNd-WAbhhzJknDC-gX72vG3K4NW_kEhbeJHi7BSkHRUfWCOfLbzSYnHOh_hC2xHhtW73zOTsRsehwdAXcidCZdX9zeCKwuADK0dB-niKXpuhD1Z8pTauJkuYlW/h120/controls.png) no-repeat -36px 0;}
#cboxBottomLeft{width:14px; height:43px; background:url(https://blogger.googleusercontent.com/img/b/R29vZ2xl/AVvXsEjHrYKhF2laa1gAu8tEPKiNd-WAbhhzJknDC-gX72vG3K4NW_kEhbeJHi7BSkHRUfWCOfLbzSYnHOh_hC2xHhtW73zOTsRsehwdAXcidCZdX9zeCKwuADK0dB-niKXpuhD1Z8pTauJkuYlW/h120/controls.png) no-repeat 0 -32px;}
#cboxBottomCenter{height:43px; background:url(https://blogger.googleusercontent.com/img/b/R29vZ2xl/AVvXsEiT6EOmzyhejdk_yClcSBE9iDGt3kPr32GsX0i2rbJRzIMP8Y8dPJhXEZ784HYvuu6BDXekOqfMktGCrGJKZ0hv7Q7SCD_DRHoBC_2BmltA24Yr0DREPZ4ImjjgdBXYBbRuk0VI42XrV2g/h120/border.png) repeat-x bottom left;}
#cboxBottomRight{width:14px; height:43px; background:url(https://blogger.googleusercontent.com/img/b/R29vZ2xl/AVvXsEjHrYKhF2laa1gAu8tEPKiNd-WAbhhzJknDC-gX72vG3K4NW_kEhbeJHi7BSkHRUfWCOfLbzSYnHOh_hC2xHhtW73zOTsRsehwdAXcidCZdX9zeCKwuADK0dB-niKXpuhD1Z8pTauJkuYlW/h120/controls.png) no-repeat -36px -32px;}
#cboxMiddleLeft{width:14px; background:url(https://blogger.googleusercontent.com/img/b/R29vZ2xl/AVvXsEjHrYKhF2laa1gAu8tEPKiNd-WAbhhzJknDC-gX72vG3K4NW_kEhbeJHi7BSkHRUfWCOfLbzSYnHOh_hC2xHhtW73zOTsRsehwdAXcidCZdX9zeCKwuADK0dB-niKXpuhD1Z8pTauJkuYlW/h120/controls.png) repeat-y -175px 0;}
#cboxMiddleRight{width:14px; background:url(https://blogger.googleusercontent.com/img/b/R29vZ2xl/AVvXsEjHrYKhF2laa1gAu8tEPKiNd-WAbhhzJknDC-gX72vG3K4NW_kEhbeJHi7BSkHRUfWCOfLbzSYnHOh_hC2xHhtW73zOTsRsehwdAXcidCZdX9zeCKwuADK0dB-niKXpuhD1Z8pTauJkuYlW/h120/controls.png) repeat-y -211px 0;}
#cboxContent{background:#fff; overflow:visible;}
#cboxLoadedContent{margin-bottom:5px;}
#cboxLoadingOverlay{background:url(https://blogger.googleusercontent.com/img/b/R29vZ2xl/AVvXsEhbZtrbQCH7pGvmBMQf0qzknsLjDvoIrk0jTWgITlPDm7YrGTlVhnKtW6FlOBbjqM-PehVdh3Mx_XrG3FhzMX6JNLQx93DqK7s4ORqaZhM9dfJJMTS-mrgbHeh3S6gioddcfkvkE12aw6w/h120/loading-background.png) no-repeat center center;}
#cboxLoadingGraphic{background:url(https://blogger.googleusercontent.com/img/b/R29vZ2xl/AVvXsEiIZlTY_0VjD7LqHExl8GOy7tuHhwvfVvU4lViGx6S6fMhbJI-MtUFcWVXbvBZ2e3cZZYU0L_Zzh39ET0g20DZIbIvLkhLQDUCXV9v1an9zzxdJjoNG19f4XH2GCIFPxdu40tw4dHWAwb14/h120/loading.gif) no-repeat center center;}
#cboxTitle{position:absolute; bottom:-25px; left:0; text-align:center; width:100%; font-weight:bold; color:#7C7C7C;}
#cboxCurrent{position:absolute; bottom:-25px; left:58px; font-weight:bold; color:#7C7C7C;}
#cboxPrevious, #cboxNext, #cboxClose, #cboxSlideshow{position:absolute; bottom:-29px; background:url(https://blogger.googleusercontent.com/img/b/R29vZ2xl/AVvXsEjHrYKhF2laa1gAu8tEPKiNd-WAbhhzJknDC-gX72vG3K4NW_kEhbeJHi7BSkHRUfWCOfLbzSYnHOh_hC2xHhtW73zOTsRsehwdAXcidCZdX9zeCKwuADK0dB-niKXpuhD1Z8pTauJkuYlW/h120/controls.pngno-repeat 0px 0px; width:23px; height:23px; text-indent:-9999px;}
#cboxPrevious{left:0px; background-position: -51px -25px;}
#cboxPrevious.hover{background-position:-51px 0px;}
#cboxNext{left:27px; background-position:-75px -25px;}
#cboxNext.hover{background-position:-75px 0px;}
#cboxClose{right:0; background-position:-100px -25px;}
#cboxClose.hover{background-position:-100px 0px;}
.cboxSlideshow_on #cboxSlideshow{background-position:-125px 0px; right:27px;}
.cboxSlideshow_on #cboxSlideshow.hover{background-position:-150px 0px;}
.cboxSlideshow_off #cboxSlideshow{background-position:-150px -25px; right:27px;}
.cboxSlideshow_off #cboxSlideshow.hover{background-position:-125px 0px;}
/*-----------------------------------------------------------------------------------*/
/* Facebook Likebox popup For Blogger
/*-----------------------------------------------------------------------------------*/
#subscribe {
font: 12px/1.2 Arial,Helvetica,san-serif; color:#666;
}
#subscribe a,
#subscribe a:hover,
#subscribe a:visited {
text-decoration:none;
}
.box-title {
color: #3B5998;
font-size: 20px !important;
font-weight: bold;
margin: 10px 0;
border:1px solid #ddd;
-moz-border-radius:6px;
-webkit-border-radius:6px;
border-radius:6px;
box-shadow: 5px 5px 5px #CCCCCC;
padding:10px;
line-height:25px; font-family:arial !important;
}
.box-tagline {
color: #999;
margin: 0;
text-align: center;
}
#subs-container {
padding: 35px 0 30px 0;
position: relative;
}
a:link, a:visited {
border:none;
}
.demo {
display:none;
}
</style>


<script src='http://ajax.googleapis.com/ajax/libs/jquery/1.5/jquery.min.js'></script>
<script src="http://supportivehandsjs.googlecode.com/files/jquery.colorbox-min.js"></script>
<script type="text/javascript">
jQuery(document).ready(function(){
if (document.cookie.indexOf('visited=true') == -1) {
var fifteenDays = 1000*60*60*24*30;
var expires = new Date((new Date()).valueOf() + fifteenDays);
document.cookie = "visited=true;expires=" + expires.toUTCString();
$.colorbox({width:"400px", inline:true, href:"#subscribe"});
}
});
</script>
<!-- This contains the hidden content for inline calls -->

<div style='display:none'>
<div id='subscribe' style='padding:10px; background:#fff;'>
<h3 class="box-title" align="center">Receive all updates via Facebook. Just Click the Like Button Below<p style="line-height:3px;" >?</p></h3>
<center>
<iframe src="//www.facebook.com/plugins/likebox.php?href=http%3A%2F%2Fwww.facebook.com%2Fapnakarachiha&amp;width=350&amp;colorscheme=light&amp;show_faces=true&amp;border_color=%23ffffff&amp;stream=false&amp;header=false&amp;height=330" scrolling="no" frameborder="0" style="border:none; overflow:hidden; width:350px; height:330px;" allowtransparency="true"></iframe>
</center>
</div>
</div>

Now change page name with your which is highlighted yellow color done now .
If you like this post must share and comments bellow thanks.

Facebook Like Box Pop Up One Time Widget

facebook-like-box-pop-up-one-time-widget

This widget pops up a jQuery window containing Facebook like box when new visitor arrives.That is a magic of jQuery, how ever, that didn't work in some third party blogger templates. Therefore, i saw many my friends worrying about the codes not working so i am sharing  today a very simple and more attractive pop like box which will be only used if you want to increase your Facebook likes rapidly.It will appear one time and visitor will come after 30 days or visitor will delete cookies then it will pop before 30 days. I have set the cookie refresh time to 30 days, which means that this popup box will appear again for the same visitor after 30 days. We can easily set the number of days to prompt the visitors about your Facebook Fan page. Lets go to the one step installation process.

Now got to blogger>>>>>Layout>>>>>Then ''Add  Gadget>>>>>(''Html,Javascript'')

Now copy below code.

<style>

/*
ColorBox Core Style:
The following CSS is consistent between example themes and should not be altered.
*/
#colorbox, #cboxOverlay, #cboxWrapper{position:absolute; top:0; left:0; z-index:9999; overflow:hidden;}
#cboxOverlay{position:fixed; width:100%; height:100%;}
#cboxMiddleLeft, #cboxBottomLeft{clear:left;}
#cboxContent{position:relative;}
#cboxLoadedContent{overflow:auto;}
#cboxTitle{margin:0;}
#cboxLoadingOverlay, #cboxLoadingGraphic{position:absolute; top:0; left:0; width:100%;}
#cboxPrevious, #cboxNext, #cboxClose, #cboxSlideshow{cursor:pointer;}
.cboxPhoto{float:left; margin:auto; border:0; display:block;}
.cboxIframe{width:100%; height:100%; display:block; border:0;}
/*


User Style:
Change the following styles to modify the appearance of ColorBox. They are
ordered & tabbed in a way that represents the nesting of the generated HTML.
*/
#cboxOverlay{background:#000;opacity:0.5 !important;}
#colorbox{
box-shadow:0 0 15px rgba(0,0,0,0.4);
-moz-box-shadow:0 0 15px rgba(0,0,0,0.4);
-webkit-box-shadow:0 0 15px rgba(0,0,0,0.4);
}
#cboxTopLeft{width:14px; height:14px; background:url(https://blogger.googleusercontent.com/img/b/R29vZ2xl/AVvXsEjHrYKhF2laa1gAu8tEPKiNd-WAbhhzJknDC-gX72vG3K4NW_kEhbeJHi7BSkHRUfWCOfLbzSYnHOh_hC2xHhtW73zOTsRsehwdAXcidCZdX9zeCKwuADK0dB-niKXpuhD1Z8pTauJkuYlW/h120/controls.png) no-repeat 0 0;}
#cboxTopCenter{height:14px; background:url(https://blogger.googleusercontent.com/img/b/R29vZ2xl/AVvXsEiT6EOmzyhejdk_yClcSBE9iDGt3kPr32GsX0i2rbJRzIMP8Y8dPJhXEZ784HYvuu6BDXekOqfMktGCrGJKZ0hv7Q7SCD_DRHoBC_2BmltA24Yr0DREPZ4ImjjgdBXYBbRuk0VI42XrV2g/h120/border.png) repeat-x top left;}
#cboxTopRight{width:14px; height:14px; background:url(https://blogger.googleusercontent.com/img/b/R29vZ2xl/AVvXsEjHrYKhF2laa1gAu8tEPKiNd-WAbhhzJknDC-gX72vG3K4NW_kEhbeJHi7BSkHRUfWCOfLbzSYnHOh_hC2xHhtW73zOTsRsehwdAXcidCZdX9zeCKwuADK0dB-niKXpuhD1Z8pTauJkuYlW/h120/controls.png) no-repeat -36px 0;}
#cboxBottomLeft{width:14px; height:43px; background:url(https://blogger.googleusercontent.com/img/b/R29vZ2xl/AVvXsEjHrYKhF2laa1gAu8tEPKiNd-WAbhhzJknDC-gX72vG3K4NW_kEhbeJHi7BSkHRUfWCOfLbzSYnHOh_hC2xHhtW73zOTsRsehwdAXcidCZdX9zeCKwuADK0dB-niKXpuhD1Z8pTauJkuYlW/h120/controls.png) no-repeat 0 -32px;}
#cboxBottomCenter{height:43px; background:url(https://blogger.googleusercontent.com/img/b/R29vZ2xl/AVvXsEiT6EOmzyhejdk_yClcSBE9iDGt3kPr32GsX0i2rbJRzIMP8Y8dPJhXEZ784HYvuu6BDXekOqfMktGCrGJKZ0hv7Q7SCD_DRHoBC_2BmltA24Yr0DREPZ4ImjjgdBXYBbRuk0VI42XrV2g/h120/border.png) repeat-x bottom left;}
#cboxBottomRight{width:14px; height:43px; background:url(https://blogger.googleusercontent.com/img/b/R29vZ2xl/AVvXsEjHrYKhF2laa1gAu8tEPKiNd-WAbhhzJknDC-gX72vG3K4NW_kEhbeJHi7BSkHRUfWCOfLbzSYnHOh_hC2xHhtW73zOTsRsehwdAXcidCZdX9zeCKwuADK0dB-niKXpuhD1Z8pTauJkuYlW/h120/controls.png) no-repeat -36px -32px;}
#cboxMiddleLeft{width:14px; background:url(https://blogger.googleusercontent.com/img/b/R29vZ2xl/AVvXsEjHrYKhF2laa1gAu8tEPKiNd-WAbhhzJknDC-gX72vG3K4NW_kEhbeJHi7BSkHRUfWCOfLbzSYnHOh_hC2xHhtW73zOTsRsehwdAXcidCZdX9zeCKwuADK0dB-niKXpuhD1Z8pTauJkuYlW/h120/controls.png) repeat-y -175px 0;}
#cboxMiddleRight{width:14px; background:url(https://blogger.googleusercontent.com/img/b/R29vZ2xl/AVvXsEjHrYKhF2laa1gAu8tEPKiNd-WAbhhzJknDC-gX72vG3K4NW_kEhbeJHi7BSkHRUfWCOfLbzSYnHOh_hC2xHhtW73zOTsRsehwdAXcidCZdX9zeCKwuADK0dB-niKXpuhD1Z8pTauJkuYlW/h120/controls.png) repeat-y -211px 0;}
#cboxContent{background:#fff; overflow:visible;}
#cboxLoadedContent{margin-bottom:5px;}
#cboxLoadingOverlay{background:url(https://blogger.googleusercontent.com/img/b/R29vZ2xl/AVvXsEhbZtrbQCH7pGvmBMQf0qzknsLjDvoIrk0jTWgITlPDm7YrGTlVhnKtW6FlOBbjqM-PehVdh3Mx_XrG3FhzMX6JNLQx93DqK7s4ORqaZhM9dfJJMTS-mrgbHeh3S6gioddcfkvkE12aw6w/h120/loading-background.png) no-repeat center center;}
#cboxLoadingGraphic{background:url(https://blogger.googleusercontent.com/img/b/R29vZ2xl/AVvXsEiIZlTY_0VjD7LqHExl8GOy7tuHhwvfVvU4lViGx6S6fMhbJI-MtUFcWVXbvBZ2e3cZZYU0L_Zzh39ET0g20DZIbIvLkhLQDUCXV9v1an9zzxdJjoNG19f4XH2GCIFPxdu40tw4dHWAwb14/h120/loading.gif) no-repeat center center;}
#cboxTitle{position:absolute; bottom:-25px; left:0; text-align:center; width:100%; font-weight:bold; color:#7C7C7C;}
#cboxCurrent{position:absolute; bottom:-25px; left:58px; font-weight:bold; color:#7C7C7C;}
#cboxPrevious, #cboxNext, #cboxClose, #cboxSlideshow{position:absolute; bottom:-29px; background:url(https://blogger.googleusercontent.com/img/b/R29vZ2xl/AVvXsEjHrYKhF2laa1gAu8tEPKiNd-WAbhhzJknDC-gX72vG3K4NW_kEhbeJHi7BSkHRUfWCOfLbzSYnHOh_hC2xHhtW73zOTsRsehwdAXcidCZdX9zeCKwuADK0dB-niKXpuhD1Z8pTauJkuYlW/h120/controls.pngno-repeat 0px 0px; width:23px; height:23px; text-indent:-9999px;}
#cboxPrevious{left:0px; background-position: -51px -25px;}
#cboxPrevious.hover{background-position:-51px 0px;}
#cboxNext{left:27px; background-position:-75px -25px;}
#cboxNext.hover{background-position:-75px 0px;}
#cboxClose{right:0; background-position:-100px -25px;}
#cboxClose.hover{background-position:-100px 0px;}
.cboxSlideshow_on #cboxSlideshow{background-position:-125px 0px; right:27px;}
.cboxSlideshow_on #cboxSlideshow.hover{background-position:-150px 0px;}
.cboxSlideshow_off #cboxSlideshow{background-position:-150px -25px; right:27px;}
.cboxSlideshow_off #cboxSlideshow.hover{background-position:-125px 0px;}
/*-----------------------------------------------------------------------------------*/
/* Facebook Likebox popup For Blogger
/*-----------------------------------------------------------------------------------*/
#subscribe {
font: 12px/1.2 Arial,Helvetica,san-serif; color:#666;
}
#subscribe a,
#subscribe a:hover,
#subscribe a:visited {
text-decoration:none;
}
.box-title {
color: #3B5998;
font-size: 20px !important;
font-weight: bold;
margin: 10px 0;
border:1px solid #ddd;
-moz-border-radius:6px;
-webkit-border-radius:6px;
border-radius:6px;
box-shadow: 5px 5px 5px #CCCCCC;
padding:10px;
line-height:25px; font-family:arial !important;
}
.box-tagline {
color: #999;
margin: 0;
text-align: center;
}
#subs-container {
padding: 35px 0 30px 0;
position: relative;
}
a:link, a:visited {
border:none;
}
.demo {
display:none;
}
</style>


<script src='http://ajax.googleapis.com/ajax/libs/jquery/1.5/jquery.min.js'></script>
<script src="http://supportivehandsjs.googlecode.com/files/jquery.colorbox-min.js"></script>
<script type="text/javascript">
jQuery(document).ready(function(){
if (document.cookie.indexOf('visited=true') == -1) {
var fifteenDays = 1000*60*60*24*30;
var expires = new Date((new Date()).valueOf() + fifteenDays);
document.cookie = "visited=true;expires=" + expires.toUTCString();
$.colorbox({width:"400px", inline:true, href:"#subscribe"});
}
});
</script>
<!-- This contains the hidden content for inline calls -->

<div style='display:none'>
<div id='subscribe' style='padding:10px; background:#fff;'>
<h3 class="box-title" align="center">Receive all updates via Facebook. Just Click the Like Button Below<p style="line-height:3px;" >?</p></h3>
<center>
<iframe src="//www.facebook.com/plugins/likebox.php?href=http%3A%2F%2Fwww.facebook.com%2Fapnakarachiha&amp;width=350&amp;colorscheme=light&amp;show_faces=true&amp;border_color=%23ffffff&amp;stream=false&amp;header=false&amp;height=330" scrolling="no" frameborder="0" style="border:none; overflow:hidden; width:350px; height:330px;" allowtransparency="true"></iframe>
</center>
</div>
</div>

Now change page name with your which is highlighted yellow color done now .
If you like this post must share and comments bellow thanks.
Posted at 02:47 |  by Unknown

Thursday, 6 June 2013

I saw a lot of my friend dont know how to send email to multiple contact through gmail but they failed to send right way now today i will tell you how to send email to multiple contact and  your recipient just will see your email id all email id will be hide.

Now go to compose mail and follow screen shot.


Then click bcc .


Then send and all contact will receive your mail and your contact will  safe no one can not see you contact that you send email to all  if you like this post then must share .........

How To Send Email To All Contacts And Groups

I saw a lot of my friend dont know how to send email to multiple contact through gmail but they failed to send right way now today i will tell you how to send email to multiple contact and  your recipient just will see your email id all email id will be hide.

Now go to compose mail and follow screen shot.


Then click bcc .


Then send and all contact will receive your mail and your contact will  safe no one can not see you contact that you send email to all  if you like this post then must share .........

Posted at 01:48 |  by Unknown
How do i set a gmail email account using a business domain and not the gmail domain. Use gmail as your default email handler - toolbar help this article was first published in 2006, then re-edited in 2011 and it s still one of our most popular posts if you re keen to learn more about styling html. Email marketing - how to clear the gmail hurdles : marketingprofs how to use the new gmail - did you know that google has completely redone gmail in this video you will learn how to use the new gmail. Video in gmail: design tests and implications for email marketing instead of opening email clients like outlook or thunderbird to send email, use toolbar s send with gmail feature to automatically open gmail s compose mail page when. How to code html email newsletters - sitepoint how to embed video in gmail emails business email marketing blog - pinpointe on embedding video in email overview pinpointe email marketing pinpointe products.

How to export gmail inbox messages and email addresses: also, aol  google just announced that a youtube preview feature is now activated on all gmail accounts this allows millions of gmail users to view you tube-hosted videos in the. Gmail priority inbox: how will it change your email marketing send to kindle via kick starter strategies: how to get vc angel investors and event management company sure gmail let s you have data liberation the problem is. How do i use gmail for a business account - email domain name if you re one of gmail s 350 million users, you know how vigorously the service defends your inbox from unwanted email obvious junk goes to the spam folder but that. How to use the new gmail video - seo inc blog we work with marketing agencies to build conversion-focused websites for their clients.
Now i am showing you some screen shot of how to create group and how to add contacts in gmail.

Login in your gmail.

Then see screen shot below and follow.

 Then select contacts.


For create a new group click new group then type group name .


How to ad contacts .


Done now .......


How To Use Gmail For Email Marketing

How do i set a gmail email account using a business domain and not the gmail domain. Use gmail as your default email handler - toolbar help this article was first published in 2006, then re-edited in 2011 and it s still one of our most popular posts if you re keen to learn more about styling html. Email marketing - how to clear the gmail hurdles : marketingprofs how to use the new gmail - did you know that google has completely redone gmail in this video you will learn how to use the new gmail. Video in gmail: design tests and implications for email marketing instead of opening email clients like outlook or thunderbird to send email, use toolbar s send with gmail feature to automatically open gmail s compose mail page when. How to code html email newsletters - sitepoint how to embed video in gmail emails business email marketing blog - pinpointe on embedding video in email overview pinpointe email marketing pinpointe products.

How to export gmail inbox messages and email addresses: also, aol  google just announced that a youtube preview feature is now activated on all gmail accounts this allows millions of gmail users to view you tube-hosted videos in the. Gmail priority inbox: how will it change your email marketing send to kindle via kick starter strategies: how to get vc angel investors and event management company sure gmail let s you have data liberation the problem is. How do i use gmail for a business account - email domain name if you re one of gmail s 350 million users, you know how vigorously the service defends your inbox from unwanted email obvious junk goes to the spam folder but that. How to use the new gmail video - seo inc blog we work with marketing agencies to build conversion-focused websites for their clients.
Now i am showing you some screen shot of how to create group and how to add contacts in gmail.

Login in your gmail.

Then see screen shot below and follow.

 Then select contacts.


For create a new group click new group then type group name .


How to ad contacts .


Done now .......


Posted at 01:19 |  by Unknown

About the Author


Rashid Minhaj is a B.Tech Holder in Electronics, He loves to making Blogging and Seo who is working online for last 7 years,he mostly creates blogs, he is managing several blogs.

Protected by Copyscape DMCA Copyright Search

Comments

Blog Archive

© 2013 BLOGGER TRICKS All rights reserved
back to top