All Stories

Monday 22 July 2013

Best Quality And Amazing Templates For Blogger Free

I am happy today sharing to this amazing offers in the previous post i shared with you about How to install template in blogger.I told you about next post i will share you free best quality word press templates for free so i was working on it and and final almost done now just some thing i want to share about this tutorial blog then i will come to point about the templates this blog is not too old or famous for you but i designed this blog after along hard working because for your help every thing can be done what ever you have blogger or word press i know some person point of view that blogger is not good for quick for get famous but my point of view every thing is possible but how you are using your way to make your blog famous here is some tricks we use SEO for blogger it is very useful for you to now come to the point .

Free Blogger Templates

Download WordPress Converted themes for free (Worth $147)

Above i have defined you all story about this now i will give you free of cost word press theme for blogger which cost is (worth $147) but its all i will give you free of cost because you love this blog and you like our every post. So today we will share 3 three premium WordPress themes which are worth ($147) means these themes are not free and they need to be purchased from Theme-junkie.com, but we’ll give you all these professional WordPress themes absolutely for free. Apart from these themes, we’ll also give you a pack of best blogger templates which are Adsense friendly.

Which premium themes you’ll get:

There are three themes for now which we’ll send you for free along with 10+ best blogger templates, the WordPress converted are worth $147 and almost 14500PKR. So you’ll get them free.

Theme # 1 Delivery (by Theme Junkie)

This theme is a premium WordPress theme worth $49 which is a professional. WordPress theme applied on thousands of popular websites. Look at the Demo

Theme # 2 Black Light (by Theme Junkie)

This theme is a premium WordPress theme worth $49 which is a professional. WordPress theme applied on thousands of popular websites. Look at the Demo
 

Theme # 3 Resizeable (by Theme Junkie)

This theme is a premium WordPress theme worth $49 which is a professional. WordPress theme applied on thousands of popular websites. Look at the Demo

 Above all template free you dont need to a penny for this template next what will you do for get this template  just blow enter your email and subscribe our news letter email subscription and put your comment below with same name of email .

Hurry Fast Now Subscribe Your Email

Enter your email address:


Additionally: Like our facebook page and follow us on google plus which is already in right sidebar Thanks for feed back we love your feed back just now put comments below then i will send you theme in your in box.

Free Quality Wordpress Converted Templates For Blogger

Best Quality And Amazing Templates For Blogger Free

I am happy today sharing to this amazing offers in the previous post i shared with you about How to install template in blogger.I told you about next post i will share you free best quality word press templates for free so i was working on it and and final almost done now just some thing i want to share about this tutorial blog then i will come to point about the templates this blog is not too old or famous for you but i designed this blog after along hard working because for your help every thing can be done what ever you have blogger or word press i know some person point of view that blogger is not good for quick for get famous but my point of view every thing is possible but how you are using your way to make your blog famous here is some tricks we use SEO for blogger it is very useful for you to now come to the point .

Free Blogger Templates

Download WordPress Converted themes for free (Worth $147)

Above i have defined you all story about this now i will give you free of cost word press theme for blogger which cost is (worth $147) but its all i will give you free of cost because you love this blog and you like our every post. So today we will share 3 three premium WordPress themes which are worth ($147) means these themes are not free and they need to be purchased from Theme-junkie.com, but we’ll give you all these professional WordPress themes absolutely for free. Apart from these themes, we’ll also give you a pack of best blogger templates which are Adsense friendly.

Which premium themes you’ll get:

There are three themes for now which we’ll send you for free along with 10+ best blogger templates, the WordPress converted are worth $147 and almost 14500PKR. So you’ll get them free.

Theme # 1 Delivery (by Theme Junkie)

This theme is a premium WordPress theme worth $49 which is a professional. WordPress theme applied on thousands of popular websites. Look at the Demo

Theme # 2 Black Light (by Theme Junkie)

This theme is a premium WordPress theme worth $49 which is a professional. WordPress theme applied on thousands of popular websites. Look at the Demo
 

Theme # 3 Resizeable (by Theme Junkie)

This theme is a premium WordPress theme worth $49 which is a professional. WordPress theme applied on thousands of popular websites. Look at the Demo

 Above all template free you dont need to a penny for this template next what will you do for get this template  just blow enter your email and subscribe our news letter email subscription and put your comment below with same name of email .

Hurry Fast Now Subscribe Your Email

Enter your email address:


Additionally: Like our facebook page and follow us on google plus which is already in right sidebar Thanks for feed back we love your feed back just now put comments below then i will send you theme in your in box.

Posted at 03:38 |  by Unknown

0 comments:

Friday 19 July 2013

Ten Success Full Seo Tricks

Seo is not very hard but its depend on you how much you are honest with your work and main thing is who is guiding you but no body will learn you seo you need to learn it by your self make blog apply tips and check results follow many pages stay updates with crawlers reply comment of your visitors make back links i will teach you but step by step because you know its very hard for me to control alone but i will try to give you daily as much as possible i will lead you here,There is a ten hot tips about seo i am sharing you it is my first success full post after launched this blog.
10 Hot Tips For Blogger Seo
Ten Hot Seo Tips

1. Make Your Post Title Optimize

It is very simple tip normally default blogger title show first in search engine so any one searching face trouble to guess about your post what is about it.So you should fix it to show first post tittle then blog title follow below step:

Login to Blogger >> Template >> HTML >> Proceed

Search this code:


<title><data:blog.pageTitle/></title>   


Replace the above code with below code:


<b:if cond='data:blog.pageType == &quot;index&quot;'> <title>
<data:blog.title/></title> <b:else/> <title><data:blog.pageName/> |
<data:blog.title/></title> </b:if>

Now done about the post title optimize.

2. Change h3 Heading Tags To h2

Its common thing seo term heading should be h2 but blogger default post title add in h3 so it is very difficult to searching your post so make some changes and replace all 7 or 8 tags.

Go to Blog Template and then HTML >> Proceed.
Search for H3 and from the CSS to HTML change all 8 or 9 H3 tags to H2.
That's all and save template.

3. Make Optimize Your  Blog Label

Some times it creates big problem for searching crawlers so we should tell to search robots that its real tag.

Go to Blog Template > HTML >> Proceed
Search for This piece of Code: 


 <a expr:href='data:label.url'

Replace above code with below code :


<a expr:href='data:label.url' rel='tag'

Save Template and done all for Labels.

Note: If rel='tag' is already there then don't change anything, leave it as it is.

 4. Optimize Comments

Comments are good for  blog or  website. But some times  they destroy the search ranking. So you sould keep comments' external links as nofollow or external nofollow. For this follow below step:
Go to Blog's Template >> HTML >> Proceed Search for this piece of Code:

expr:href='data:post.createLinkUrl'

Remove  above one and paste below code at the place of above:


rel='external nofollow'  expr:href='data:post.createLinkUrl'

Save Template and that's all about comments.

5. Optimize Blog Archives

This is another problem with blogger blogs. Which is I discussed about last post with screen shot. Archives pages  make problems for search robots. So if you want to solve of this problem then just  follow given steps below:
 Go to Blog's Template >> HTML >> Proceed
Search for this piece of Code

<a class='post-count-link' expr:href='data:i.url'>

 Replace above code with one below:

<a rel="archives" class='post-count-link' expr:href='data:i.url'>

Save template and that's all done about Archives.

6. Make Enable Meta Description & Post Search Description

Now with new blogger interface we can write search description for single post or page.But first of all we will have to enable this option in blogger interface. Make it go to your Blog's Setting >>
Search Preferences >> Meta Tags >> Enable >> Yes and write maximum of 150 letters meta description for your blog and save it.
Now below the page find custom robots header tags. and enable it with this setting showing in picture below:


Save Changes and that's all for meta description tags. By enabling this option you will be able to write meta description for each of your new post. This is  search meta description. after enabled this option you will see a small box named [search description] now  every new post side bar, so you can write 130 to 150 characters unique search description for every individual post. This should be unique from the post title.

7. Change the Static Meta Description 

After implement above tips about seo in blogger dynamic description added but all code old interface change it to new follow below step:

Go to Blog's Template >> HTML >> Proceed Just below the <head> tag insert below code

<b:if cond='data:blog.metaDescription != &quot;&quot;'>
 <meta expr:content='data:blog.metaDescription' name='description'/>
 </b:if>

 Save template and done now  for changing meta tags.

8. Add Custom Robot.txt file

This is another unique and benefit able  but warning use it if you can because it can be destroy  your blog rank in a second if you will use wrong so be careful  and follow bellow step to add custom robot.txt file.
Go to Blog's Setting >> Search Preferences >> Below the page find Custom  Robot.txt as showing in below image.First enable this option and the yes, so the box will appear like below pic:


Copy below code and paste it in that box.

User-agent: Mediapartners-Google
Disallow:
User-agent: *
Disallow: /search?q=*
Disallow: /*?updated-max=*
Allow: /
Sitemap: http://www.edurashid.blogspot.com/feeds/posts/default?orderby=updated

Note : Replace sitemap URL with your URL done now.

9. Submit your blog in Google Webmaster

I have discussed about it previous post so just I will show up in this post how to submit so follow below step:

Log in to your "Google webmaster" account.
Click on "ADD A SITE" enter your blog URL.
Click on "Owner verification page" Select below "Verify using a different method."
After that it will ask to you four option. Select last one "HTML Tag"
Copy Google "meta tag". 
Go to your blogger : Dashboard>> Template>>Edit HTML.
Add this meta tag in your template below "<head>" and click on SAVE

10. Submit Site Map

You have posted 25 more then post in your blog so submit your site map it will better for you follow below step:
Log in to your "Google webmaster" account.
Now click on sitemap then ADD/TEST SITEMAP.


For less than 500 post submit this sitemap:

atom.xml?redirect=false&start-index=1&max-results=500

 And now this for more than 500 posts you can submit multiple sitemaps like below:
 
atom.xml?redirect=false&start-index=1&max-results=500
atom.xml?redirect=false&start-index=501&max-results=1000

Now Done All i hope every one will appreciate this helpful tricks which keep supporting us like our page and share post for others help.

10 Hot Tricks For Blogger Seo

Ten Success Full Seo Tricks

Seo is not very hard but its depend on you how much you are honest with your work and main thing is who is guiding you but no body will learn you seo you need to learn it by your self make blog apply tips and check results follow many pages stay updates with crawlers reply comment of your visitors make back links i will teach you but step by step because you know its very hard for me to control alone but i will try to give you daily as much as possible i will lead you here,There is a ten hot tips about seo i am sharing you it is my first success full post after launched this blog.
10 Hot Tips For Blogger Seo
Ten Hot Seo Tips

1. Make Your Post Title Optimize

It is very simple tip normally default blogger title show first in search engine so any one searching face trouble to guess about your post what is about it.So you should fix it to show first post tittle then blog title follow below step:

Login to Blogger >> Template >> HTML >> Proceed

Search this code:


<title><data:blog.pageTitle/></title>   


Replace the above code with below code:


<b:if cond='data:blog.pageType == &quot;index&quot;'> <title>
<data:blog.title/></title> <b:else/> <title><data:blog.pageName/> |
<data:blog.title/></title> </b:if>

Now done about the post title optimize.

2. Change h3 Heading Tags To h2

Its common thing seo term heading should be h2 but blogger default post title add in h3 so it is very difficult to searching your post so make some changes and replace all 7 or 8 tags.

Go to Blog Template and then HTML >> Proceed.
Search for H3 and from the CSS to HTML change all 8 or 9 H3 tags to H2.
That's all and save template.

3. Make Optimize Your  Blog Label

Some times it creates big problem for searching crawlers so we should tell to search robots that its real tag.

Go to Blog Template > HTML >> Proceed
Search for This piece of Code: 


 <a expr:href='data:label.url'

Replace above code with below code :


<a expr:href='data:label.url' rel='tag'

Save Template and done all for Labels.

Note: If rel='tag' is already there then don't change anything, leave it as it is.

 4. Optimize Comments

Comments are good for  blog or  website. But some times  they destroy the search ranking. So you sould keep comments' external links as nofollow or external nofollow. For this follow below step:
Go to Blog's Template >> HTML >> Proceed Search for this piece of Code:

expr:href='data:post.createLinkUrl'

Remove  above one and paste below code at the place of above:


rel='external nofollow'  expr:href='data:post.createLinkUrl'

Save Template and that's all about comments.

5. Optimize Blog Archives

This is another problem with blogger blogs. Which is I discussed about last post with screen shot. Archives pages  make problems for search robots. So if you want to solve of this problem then just  follow given steps below:
 Go to Blog's Template >> HTML >> Proceed
Search for this piece of Code

<a class='post-count-link' expr:href='data:i.url'>

 Replace above code with one below:

<a rel="archives" class='post-count-link' expr:href='data:i.url'>

Save template and that's all done about Archives.

6. Make Enable Meta Description & Post Search Description

Now with new blogger interface we can write search description for single post or page.But first of all we will have to enable this option in blogger interface. Make it go to your Blog's Setting >>
Search Preferences >> Meta Tags >> Enable >> Yes and write maximum of 150 letters meta description for your blog and save it.
Now below the page find custom robots header tags. and enable it with this setting showing in picture below:


Save Changes and that's all for meta description tags. By enabling this option you will be able to write meta description for each of your new post. This is  search meta description. after enabled this option you will see a small box named [search description] now  every new post side bar, so you can write 130 to 150 characters unique search description for every individual post. This should be unique from the post title.

7. Change the Static Meta Description 

After implement above tips about seo in blogger dynamic description added but all code old interface change it to new follow below step:

Go to Blog's Template >> HTML >> Proceed Just below the <head> tag insert below code

<b:if cond='data:blog.metaDescription != &quot;&quot;'>
 <meta expr:content='data:blog.metaDescription' name='description'/>
 </b:if>

 Save template and done now  for changing meta tags.

8. Add Custom Robot.txt file

This is another unique and benefit able  but warning use it if you can because it can be destroy  your blog rank in a second if you will use wrong so be careful  and follow bellow step to add custom robot.txt file.
Go to Blog's Setting >> Search Preferences >> Below the page find Custom  Robot.txt as showing in below image.First enable this option and the yes, so the box will appear like below pic:


Copy below code and paste it in that box.

User-agent: Mediapartners-Google
Disallow:
User-agent: *
Disallow: /search?q=*
Disallow: /*?updated-max=*
Allow: /
Sitemap: http://www.edurashid.blogspot.com/feeds/posts/default?orderby=updated

Note : Replace sitemap URL with your URL done now.

9. Submit your blog in Google Webmaster

I have discussed about it previous post so just I will show up in this post how to submit so follow below step:

Log in to your "Google webmaster" account.
Click on "ADD A SITE" enter your blog URL.
Click on "Owner verification page" Select below "Verify using a different method."
After that it will ask to you four option. Select last one "HTML Tag"
Copy Google "meta tag". 
Go to your blogger : Dashboard>> Template>>Edit HTML.
Add this meta tag in your template below "<head>" and click on SAVE

10. Submit Site Map

You have posted 25 more then post in your blog so submit your site map it will better for you follow below step:
Log in to your "Google webmaster" account.
Now click on sitemap then ADD/TEST SITEMAP.


For less than 500 post submit this sitemap:

atom.xml?redirect=false&start-index=1&max-results=500

 And now this for more than 500 posts you can submit multiple sitemaps like below:
 
atom.xml?redirect=false&start-index=1&max-results=500
atom.xml?redirect=false&start-index=501&max-results=1000

Now Done All i hope every one will appreciate this helpful tricks which keep supporting us like our page and share post for others help.

Posted at 10:24 |  by Unknown

0 comments:

Thursday 18 July 2013

Change post title before blog title

Many people do not know about this tricks so i am sharing you most important tips today about the post title let suppose you are searching in google and you got some URL which one have a blog title first for example  you are searching How To Install Template .Now Look default blogger will show like below.
BLOGGER TRICKS I How To Install Template 

But i will give you suggestion that use this Tips and your post title  should be show before blog title like below

How To Install Template I BLOGGER TRICKS

Then visitor see your post title and easily get what he/she want which is very important  you post title should be before blog title now see image .

how to show up post title before blog title in search engine
Important Tips For Blogger
Above screen shot of blog i made just recently i have not  implement seo tips in this blog .
1. Blog Title
2. Blog URL
3. Post Description
4. Blog Title Which is showing up before post title it not good so i am telling you it should be after post title.
5. Post Title it is showing after blog tittle.
6. It is archive URL which is following searching engine robot , it should be "No follow" i will tell you about "No follow" or "Do follow" in next post.

Lets come to the point how to replace post title before from blog title.

In the above screen shot we have observed that blog title not good in the first for our blog rank then should be after post title.
1. Go to blogger.
2. Template>>Edit HTML>>
3. Find below code. 

<title><data:blog.pageTitle/></title>

And replace with below code with above.

<b:if cond='data:blog.pageType == &quot;item&quot;'>
<title><data:blog.pageName/> | <data:blog.title/></title>
 <b:else/>
<title><data:blog.pageTitle/></title>
</b:if>

Now save your template and see in google if it is not showing will be show up later some time google take time to index. enjoy and supporting us to like our post and page.

How To Show Up Post Title Before Blog Title In Search Engine

Change post title before blog title

Many people do not know about this tricks so i am sharing you most important tips today about the post title let suppose you are searching in google and you got some URL which one have a blog title first for example  you are searching How To Install Template .Now Look default blogger will show like below.
BLOGGER TRICKS I How To Install Template 

But i will give you suggestion that use this Tips and your post title  should be show before blog title like below

How To Install Template I BLOGGER TRICKS

Then visitor see your post title and easily get what he/she want which is very important  you post title should be before blog title now see image .

how to show up post title before blog title in search engine
Important Tips For Blogger
Above screen shot of blog i made just recently i have not  implement seo tips in this blog .
1. Blog Title
2. Blog URL
3. Post Description
4. Blog Title Which is showing up before post title it not good so i am telling you it should be after post title.
5. Post Title it is showing after blog tittle.
6. It is archive URL which is following searching engine robot , it should be "No follow" i will tell you about "No follow" or "Do follow" in next post.

Lets come to the point how to replace post title before from blog title.

In the above screen shot we have observed that blog title not good in the first for our blog rank then should be after post title.
1. Go to blogger.
2. Template>>Edit HTML>>
3. Find below code. 

<title><data:blog.pageTitle/></title>

And replace with below code with above.

<b:if cond='data:blog.pageType == &quot;item&quot;'>
<title><data:blog.pageName/> | <data:blog.title/></title>
 <b:else/>
<title><data:blog.pageTitle/></title>
</b:if>

Now save your template and see in google if it is not showing will be show up later some time google take time to index. enjoy and supporting us to like our post and page.

Posted at 09:48 |  by Unknown

0 comments:

Wednesday 17 July 2013

Why do we need to change looking of our widget like popular post and others because every want to our blog looking better than others so i am hard working for your help and i share with you widget and plugins now i am sharing with you popular post rotation hover .


See demo
1. Login to blogger.com.
2. Select your blog if you have many.
3. Then go to Template>>>Click on edit HTML.
4. Then search for ]]></b:skin> 
5. Then copy the below code and paste it just above it and save your template.
6. Then click on save. 

Remember you should always have a back up to your template.

#PopularPosts1 {    max-width: 300px}

#PopularPosts1 dd {    float: left;    border-bottom: none;    margin: 8px 8px 0 8px;    background: none;    display: block;    padding: 0}

#PopularPosts1 img {    -webkit-transition: all 0.5s ease;    -moz-transition: all 0.5s ease;    transition: all 0.5s ease;    padding: 4px;    background: #eee;    background: -webkit-gradient(linear, left top, left bottom, from(#eee), color-stop(0.5, #ddd), color-stop(0.5, #c0c0c0), to(#aaa));    background: -moz-linear-gradient(top, #eee, #ddd 50%, #c0c0c0 50%, #aaa);    -webkit-border-radius: 4px;    -moz-border-radius: 4px;    border-radius: 4px;    -webkit-box-shadow: 0 0 3px rgba(0,0,0,.7);    -moz-box-shadow: 0 0 3px rgba(0,0,0,.7);    box-shadow: 0 0 3px rgba(0,0,0,.7);}

#PopularPosts1 img:hover {    -moz-transform: scale(1.2) rotate(-350deg);    -webkit-transform: scale(1.2) rotate(-350deg);    -o-transform: scale(1.2) rotate(-350deg);    -ms-transform: scale(1.2) rotate(-350deg);    transform: scale(1.2) rotate(-350deg);    -webkit-box-shadow: 0 0 20px rgba(255,0,0,.4), inset 0 0 20px rgba(255,255,255,1);    -moz-box-shadow: 0 0 20px rgba(255,0,0,.4), inset 0 0 20px rgba(255,255,255,1);    box-shadow: 0 0 20px rgba(255,0,0,.4), inset 0 0 20px rgba(255,255,255,1);}

Now save and enjoy must share this post or like .see our previous post about images rotation.

How To Make Popular Post Images Spining Rotate In Blogger

Why do we need to change looking of our widget like popular post and others because every want to our blog looking better than others so i am hard working for your help and i share with you widget and plugins now i am sharing with you popular post rotation hover .


See demo
1. Login to blogger.com.
2. Select your blog if you have many.
3. Then go to Template>>>Click on edit HTML.
4. Then search for ]]></b:skin> 
5. Then copy the below code and paste it just above it and save your template.
6. Then click on save. 

Remember you should always have a back up to your template.

#PopularPosts1 {    max-width: 300px}

#PopularPosts1 dd {    float: left;    border-bottom: none;    margin: 8px 8px 0 8px;    background: none;    display: block;    padding: 0}

#PopularPosts1 img {    -webkit-transition: all 0.5s ease;    -moz-transition: all 0.5s ease;    transition: all 0.5s ease;    padding: 4px;    background: #eee;    background: -webkit-gradient(linear, left top, left bottom, from(#eee), color-stop(0.5, #ddd), color-stop(0.5, #c0c0c0), to(#aaa));    background: -moz-linear-gradient(top, #eee, #ddd 50%, #c0c0c0 50%, #aaa);    -webkit-border-radius: 4px;    -moz-border-radius: 4px;    border-radius: 4px;    -webkit-box-shadow: 0 0 3px rgba(0,0,0,.7);    -moz-box-shadow: 0 0 3px rgba(0,0,0,.7);    box-shadow: 0 0 3px rgba(0,0,0,.7);}

#PopularPosts1 img:hover {    -moz-transform: scale(1.2) rotate(-350deg);    -webkit-transform: scale(1.2) rotate(-350deg);    -o-transform: scale(1.2) rotate(-350deg);    -ms-transform: scale(1.2) rotate(-350deg);    transform: scale(1.2) rotate(-350deg);    -webkit-box-shadow: 0 0 20px rgba(255,0,0,.4), inset 0 0 20px rgba(255,255,255,1);    -moz-box-shadow: 0 0 20px rgba(255,0,0,.4), inset 0 0 20px rgba(255,255,255,1);    box-shadow: 0 0 20px rgba(255,0,0,.4), inset 0 0 20px rgba(255,255,255,1);}

Now save and enjoy must share this post or like .see our previous post about images rotation.

Posted at 03:47 |  by Unknown

0 comments:

This is my first post about image rotation do you know CSS code yes it is very help full or compatible  with all browser .Transformation is powerful feature of css its depend on Scaling, Translation, and Rotation.It is a pure code which is i explained today with you.I know you are thinking about demo of this code.
click below for see demo
1. Login to blogger.com.
2. Select your blog if you have many.
3. Then go to Template>>>Click on edit HTML.
4. Then search for ]]></b:skin>
5. Then copy the below code and paste it just above it and save your template.
6. Then click on save.


Remember you should always have a back up to your template.
.rotate img{
-moz-transition: all 1s ease-in-out;
-webkit-transition: all 1s ease-in-out;
-o-transition: all 1s ease-in-out;
-ms-transition: all 1s ease-in-out;
transition: all 1s ease-in-out;
}
.rotate img:hover{
-moz-transform: rotate(350deg);
-webkit-transform: rotate(350deg);
-o-transform: rotate(350deg);
-ms-transform: rotate(350deg);
transform: rotate(350deg);
}

How it will be effect in blogger post see now. You need to some changes in your post HTML.
Go to your post HTML find below code.


<img border="0" src="https://blogger.googleusercontent.com/img/b/R29vZ2xl/AVvXsEgoZHZiSsR8cc7TK0IVn3A4cjbJ1nOBrtpaCs40j1TFLH4TDvTYwfY7GEPQeBAsY1iIwyWBfwGux_J0uTBeKmuzK4gMNZlg3_eGNV3Y0MMXY1y77WeAlUhidwdViR5MwfgrmiITm6-FdpE/s1600/demo1.jpg" /></a></div>

Add some code before this URL with End Tags.


<div class="rotate"> <img border="0" src="https://blogger.googleusercontent.com/img/b/R29vZ2xl/AVvXsEgoZHZiSsR8cc7TK0IVn3A4cjbJ1nOBrtpaCs40j1TFLH4TDvTYwfY7GEPQeBAsY1iIwyWBfwGux_J0uTBeKmuzK4gMNZlg3_eGNV3Y0MMXY1y77WeAlUhidwdViR5MwfgrmiITm6-FdpE/s1600/demo1.jpg" /></div></a></div>


NOTE :
In the above CSS code 350 deg specifies the degree of rotation you can change this value according to your own choice.

Almost done and look you site post drag mouse over in your images and play and must share this post .

How To Add Image Rotation Or Spinning Effect To Blogger

This is my first post about image rotation do you know CSS code yes it is very help full or compatible  with all browser .Transformation is powerful feature of css its depend on Scaling, Translation, and Rotation.It is a pure code which is i explained today with you.I know you are thinking about demo of this code.
click below for see demo
1. Login to blogger.com.
2. Select your blog if you have many.
3. Then go to Template>>>Click on edit HTML.
4. Then search for ]]></b:skin>
5. Then copy the below code and paste it just above it and save your template.
6. Then click on save.


Remember you should always have a back up to your template.
.rotate img{
-moz-transition: all 1s ease-in-out;
-webkit-transition: all 1s ease-in-out;
-o-transition: all 1s ease-in-out;
-ms-transition: all 1s ease-in-out;
transition: all 1s ease-in-out;
}
.rotate img:hover{
-moz-transform: rotate(350deg);
-webkit-transform: rotate(350deg);
-o-transform: rotate(350deg);
-ms-transform: rotate(350deg);
transform: rotate(350deg);
}

How it will be effect in blogger post see now. You need to some changes in your post HTML.
Go to your post HTML find below code.


<img border="0" src="https://blogger.googleusercontent.com/img/b/R29vZ2xl/AVvXsEgoZHZiSsR8cc7TK0IVn3A4cjbJ1nOBrtpaCs40j1TFLH4TDvTYwfY7GEPQeBAsY1iIwyWBfwGux_J0uTBeKmuzK4gMNZlg3_eGNV3Y0MMXY1y77WeAlUhidwdViR5MwfgrmiITm6-FdpE/s1600/demo1.jpg" /></a></div>

Add some code before this URL with End Tags.


<div class="rotate"> <img border="0" src="https://blogger.googleusercontent.com/img/b/R29vZ2xl/AVvXsEgoZHZiSsR8cc7TK0IVn3A4cjbJ1nOBrtpaCs40j1TFLH4TDvTYwfY7GEPQeBAsY1iIwyWBfwGux_J0uTBeKmuzK4gMNZlg3_eGNV3Y0MMXY1y77WeAlUhidwdViR5MwfgrmiITm6-FdpE/s1600/demo1.jpg" /></div></a></div>


NOTE :
In the above CSS code 350 deg specifies the degree of rotation you can change this value according to your own choice.

Almost done and look you site post drag mouse over in your images and play and must share this post .

Posted at 02:02 |  by Unknown

1 comments:

Tuesday 16 July 2013

Search Engine optimized is a alone legal way you can get visitors tons of  but main thing how much you are honest with your work and positive I saw many people leave work in half way when they get visitors so keep calm and do work with honest don not use copy content use fresh content and with your mind as much you can not too much. SEO is not a complicated thing everything nothing imposable in This World today I will tell you how to make Search Engine Optimized blog.

Search Engine Optimized Your Blog


1. Social book marking button is important for your  blog popularity and page rank let suppose some one read your post and he like or share your post its mean his friend list or followers get notification about your post so must you put  share button or like or follow any social sharing button.

 2. Use post title unique work that search engine robot identify easily what is in your post.

 3. Use Meta Tag description it is help full for search query when visitors will search any key words then post title or meta description is main to show up about your post.


4. Submit your URL to search engine like Google or Bing both are important search engine.


5. Use Optimized images some time visitor come to your site through images use ALT-Text.

6. Submit your blog in Google Webmaster.Why you need to submit because some time google delay to index your blog if you will submit your blog then google will identify that you are really owner of this blog  and your blog will index quicker .
 

This post is helpful for you right just give one minute to share to this post to help others too next post i will explain one by one above all things with definition and screen shot.

Search Engine Optimized Your Blog

Search Engine optimized is a alone legal way you can get visitors tons of  but main thing how much you are honest with your work and positive I saw many people leave work in half way when they get visitors so keep calm and do work with honest don not use copy content use fresh content and with your mind as much you can not too much. SEO is not a complicated thing everything nothing imposable in This World today I will tell you how to make Search Engine Optimized blog.

Search Engine Optimized Your Blog


1. Social book marking button is important for your  blog popularity and page rank let suppose some one read your post and he like or share your post its mean his friend list or followers get notification about your post so must you put  share button or like or follow any social sharing button.

 2. Use post title unique work that search engine robot identify easily what is in your post.

 3. Use Meta Tag description it is help full for search query when visitors will search any key words then post title or meta description is main to show up about your post.


4. Submit your URL to search engine like Google or Bing both are important search engine.


5. Use Optimized images some time visitor come to your site through images use ALT-Text.

6. Submit your blog in Google Webmaster.Why you need to submit because some time google delay to index your blog if you will submit your blog then google will identify that you are really owner of this blog  and your blog will index quicker .
 

This post is helpful for you right just give one minute to share to this post to help others too next post i will explain one by one above all things with definition and screen shot.

Posted at 03:50 |  by Unknown

0 comments:

Monday 15 July 2013

Many friends asked me how to put facebook fan box in blogger or any site so not to to worry i am sharing you today how can you install it on your blog or site.Go to facebook developer.Now follow simple steps.


Step 1.
Facebook page URL copy your and paste in box.
Step 2.
Width chose as you want.
Step 3.
Height will be default.
Step 4.
Show face tick there if you dont want to show face un tick box.
Step 5.
Here is two option Light and Dark click on box and chose any one what you want.
Step 6.
Stream if you want to see your post stream in box so tick other if dont want then un tick.
Step 7.
Show border   if you want then tick or dont want border out side of box un tick.
Step 8.
Show header it will show find us on facebook on top of the box if you dont un tick.
Then final click on GET CODE.Now new window will pop up see bellow.

Top of the 4 option chose IFRAME and copy code.
Then go to Layout >>Add a Gadget / HTML Java script>> paste that code in box and save.Done.

If you have any problem  about this post put question bellow comments box .

Put Facebook Fan Page On Blogger Or Site.

Many friends asked me how to put facebook fan box in blogger or any site so not to to worry i am sharing you today how can you install it on your blog or site.Go to facebook developer.Now follow simple steps.


Step 1.
Facebook page URL copy your and paste in box.
Step 2.
Width chose as you want.
Step 3.
Height will be default.
Step 4.
Show face tick there if you dont want to show face un tick box.
Step 5.
Here is two option Light and Dark click on box and chose any one what you want.
Step 6.
Stream if you want to see your post stream in box so tick other if dont want then un tick.
Step 7.
Show border   if you want then tick or dont want border out side of box un tick.
Step 8.
Show header it will show find us on facebook on top of the box if you dont un tick.
Then final click on GET CODE.Now new window will pop up see bellow.

Top of the 4 option chose IFRAME and copy code.
Then go to Layout >>Add a Gadget / HTML Java script>> paste that code in box and save.Done.

If you have any problem  about this post put question bellow comments box .

Posted at 08:31 |  by Unknown

0 comments:

Social Widget is common thing if you place like this it attractive and looking professional when visitor will see it must click on it to see what is there in side of this so main thing i design it on HTML so it is easy to install any one can install it. 

Step 1

Go To Blogger Layout.
Add HTML/Java Widget.
And Paste Below Code In It.


<center><a href="https://www.facebook.com/insuranceandeducation" target='blank'><img border='1' src="https://blogger.googleusercontent.com/img/b/R29vZ2xl/AVvXsEj9bzz3qdqxlYptRK5E-VjZuNumE09paqK_8idHuUVoax7gMdUAOZ_GEpSgkCcgrr8P2bsuvXGtLQnu_eIsuJxMZeCHydN2xhPeLBDg34GQ981enT1qVw_LHsNItLcH5Q-DtsYJFd3IyfQ/s1600/fb.jpg" /></a><a href="https://twitter.com/rashidminhaj" target='blank'><img border='1' src="https://blogger.googleusercontent.com/img/b/R29vZ2xl/AVvXsEhzH481UtPgHMAw7V69MSRWI-8zc3Hl0GT8AUg6c9cVlClf8hRL6spsJfjrLd59eOvEDKsSgw8y5iogpWaKhV1DxeJyWkTr7n-86fzWq0Q8MDe2pZH-y-dcGIx1ZSWf24IGwuKgr6DhWQE/s1600/twitter.jpg" /></a>
    <a href="https://plus.google.com/googleid" target='blank'><img border='1' src="https://blogger.googleusercontent.com/img/b/R29vZ2xl/AVvXsEg1oUfhzzMIEMJOgjOWQ8Kin_wCSahc052QNvbEKO60s93Q56q6H_6KsaOXYV9K7fHRmmsqvBVp0QkYAJf8RuxEAQe9z7ctKVZFIrJ9qYhM7ixkZhB0sExLHVDA14WmN30Y5qf5Naji70I/s1600/g+.jpg" /></a>
<a href="http://feedburner.google.com/fb/a/mailverify?uri=edurashid" target='blank'><img border='1' src="https://blogger.googleusercontent.com/img/b/R29vZ2xl/AVvXsEi7j_wdwQ4OBv1a241F0bTxF5PY6boGqoO2m7R5RTmKul-OPlJincv0RwIlro2UEu43DrQYQZ9lk33VsObVDF0crH2W0RWiMBnOp1TJZ49cowzJDxogFOiQme5st1XUw-LpOqF1U9f1Nho/s1600/rss.jpg" /></a></center><center><a href='http://edurashid.blogspot.com/2013/07/beautiful-social-sites-sharing-widget.html' target='blank'>Get This Widget<a/><center>


You need to change following id,s.
If you want to add your Facebook Page replace it insuranceandeducation
If you want to add your Twitter Username replace it rashidminhaj
If you want to add your Google+ Id replace it googleid
If you want to add your FeedBurner Id replace it edurashid

Note:
If you find any problem regarding'Beautiful Social Sites Sharing Widget'then feel free to comment below.

Beautiful Social Sites Sharing Widget

Social Widget is common thing if you place like this it attractive and looking professional when visitor will see it must click on it to see what is there in side of this so main thing i design it on HTML so it is easy to install any one can install it. 

Step 1

Go To Blogger Layout.
Add HTML/Java Widget.
And Paste Below Code In It.


<center><a href="https://www.facebook.com/insuranceandeducation" target='blank'><img border='1' src="https://blogger.googleusercontent.com/img/b/R29vZ2xl/AVvXsEj9bzz3qdqxlYptRK5E-VjZuNumE09paqK_8idHuUVoax7gMdUAOZ_GEpSgkCcgrr8P2bsuvXGtLQnu_eIsuJxMZeCHydN2xhPeLBDg34GQ981enT1qVw_LHsNItLcH5Q-DtsYJFd3IyfQ/s1600/fb.jpg" /></a><a href="https://twitter.com/rashidminhaj" target='blank'><img border='1' src="https://blogger.googleusercontent.com/img/b/R29vZ2xl/AVvXsEhzH481UtPgHMAw7V69MSRWI-8zc3Hl0GT8AUg6c9cVlClf8hRL6spsJfjrLd59eOvEDKsSgw8y5iogpWaKhV1DxeJyWkTr7n-86fzWq0Q8MDe2pZH-y-dcGIx1ZSWf24IGwuKgr6DhWQE/s1600/twitter.jpg" /></a>
    <a href="https://plus.google.com/googleid" target='blank'><img border='1' src="https://blogger.googleusercontent.com/img/b/R29vZ2xl/AVvXsEg1oUfhzzMIEMJOgjOWQ8Kin_wCSahc052QNvbEKO60s93Q56q6H_6KsaOXYV9K7fHRmmsqvBVp0QkYAJf8RuxEAQe9z7ctKVZFIrJ9qYhM7ixkZhB0sExLHVDA14WmN30Y5qf5Naji70I/s1600/g+.jpg" /></a>
<a href="http://feedburner.google.com/fb/a/mailverify?uri=edurashid" target='blank'><img border='1' src="https://blogger.googleusercontent.com/img/b/R29vZ2xl/AVvXsEi7j_wdwQ4OBv1a241F0bTxF5PY6boGqoO2m7R5RTmKul-OPlJincv0RwIlro2UEu43DrQYQZ9lk33VsObVDF0crH2W0RWiMBnOp1TJZ49cowzJDxogFOiQme5st1XUw-LpOqF1U9f1Nho/s1600/rss.jpg" /></a></center><center><a href='http://edurashid.blogspot.com/2013/07/beautiful-social-sites-sharing-widget.html' target='blank'>Get This Widget<a/><center>


You need to change following id,s.
If you want to add your Facebook Page replace it insuranceandeducation
If you want to add your Twitter Username replace it rashidminhaj
If you want to add your Google+ Id replace it googleid
If you want to add your FeedBurner Id replace it edurashid

Note:
If you find any problem regarding'Beautiful Social Sites Sharing Widget'then feel free to comment below.

Posted at 05:58 |  by Unknown

0 comments:

Sunday 14 July 2013

I am sharing you  today how to add comment box in blogger and any site via HTML gadget.Its another interesting gadget let suppose some people dont comments in your comments box so it will new for visitor when they will see facebook comments box must they will put some comments so follow my instruction and first see demo pic.


Now go to to facebook developers .
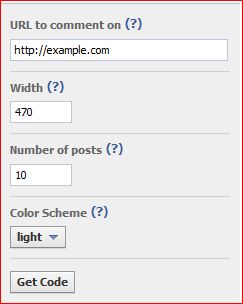
Then put your url , chose width and number of post what you want then hit get code.


Now after get code one window will appear like below .


There will be two code box just copy first code from the above then go Blogger Dashborad >>Template>>HTML now find <body> tag and paste above 1st one code after <body>.Next look another 2nd code and copy that and go to <<add a gadget>>add HTML JavaScript box and paste that 2nd code and drag and drop this gadget where you want to place .

 If you like this post must share or comments and need any help feel free ask question bellow i love to help other and also love to teach some thing new ...

Add Facebook Comments Box In Blogger And Any Site.

I am sharing you  today how to add comment box in blogger and any site via HTML gadget.Its another interesting gadget let suppose some people dont comments in your comments box so it will new for visitor when they will see facebook comments box must they will put some comments so follow my instruction and first see demo pic.


Now go to to facebook developers .
Then put your url , chose width and number of post what you want then hit get code.


Now after get code one window will appear like below .


There will be two code box just copy first code from the above then go Blogger Dashborad >>Template>>HTML now find <body> tag and paste above 1st one code after <body>.Next look another 2nd code and copy that and go to <<add a gadget>>add HTML JavaScript box and paste that 2nd code and drag and drop this gadget where you want to place .

 If you like this post must share or comments and need any help feel free ask question bellow i love to help other and also love to teach some thing new ...

Posted at 05:21 |  by Unknown

0 comments:

Saturday 13 July 2013

Html-CSS-Javascript code you can post with out back ground as plan text but its look better then that because your visitor when will see and will be know back grounded color is all coding. i know you wanna see live demo of  how will look after this coding apply see below screen shot.


Now got to blogger dashboard>>>>>Edit HTML>>>>>>>>>>
Now find this below code.

<b:skin>

A now expand  above code to click on left side  small arrow .
Now Find .

]]></b:skin>

Now copy below all codes and past it above which you find skin code after expand .

.post blockquote {
background: #C8EFFF url(https://lh4.googleusercontent.com/-A-bHiDpJJDQ/UOUZM15D_OI/AAAAAAAAAhQ/DfDswKeB_Kc/w497-h373/1.png);
background-position:top left;
background-repeat:repeat-y;
margin: 0 20px;
padding: 10px 20px 10px 45px;
border-top: 2px solid #DDD;
border-right: 5px solid #666;
border-left: 2px solid #DDD;
border-bottom: 5px solid #666;
font-size: 0.9em;
}
.post blockquote p {
margin: 0;
padding: 0 0 15px;
}
.blockquote {
font: 18px normal  sans-serif,Tahoma;
padding-top: 10px;
margin: 5px;
text-indent: 65px;
}
.blockquote div {
display: block;
padding-bottom:10px;
}
.blockquote p {
margin: 0;
padding-top:10px;
}

You can change background colour just replace background color code with yours. If it is Useful or helpful  for you then it will be others so dont hesitate to share and like and comments . or need any help from me most welcome any time just leave your comments or add me on facebook.

How TO Add HTML-CSS-Javascript Codes in Blogger Post As Plain Text

Html-CSS-Javascript code you can post with out back ground as plan text but its look better then that because your visitor when will see and will be know back grounded color is all coding. i know you wanna see live demo of  how will look after this coding apply see below screen shot.


Now got to blogger dashboard>>>>>Edit HTML>>>>>>>>>>
Now find this below code.

<b:skin>

A now expand  above code to click on left side  small arrow .
Now Find .

]]></b:skin>

Now copy below all codes and past it above which you find skin code after expand .

.post blockquote {
background: #C8EFFF url(https://lh4.googleusercontent.com/-A-bHiDpJJDQ/UOUZM15D_OI/AAAAAAAAAhQ/DfDswKeB_Kc/w497-h373/1.png);
background-position:top left;
background-repeat:repeat-y;
margin: 0 20px;
padding: 10px 20px 10px 45px;
border-top: 2px solid #DDD;
border-right: 5px solid #666;
border-left: 2px solid #DDD;
border-bottom: 5px solid #666;
font-size: 0.9em;
}
.post blockquote p {
margin: 0;
padding: 0 0 15px;
}
.blockquote {
font: 18px normal  sans-serif,Tahoma;
padding-top: 10px;
margin: 5px;
text-indent: 65px;
}
.blockquote div {
display: block;
padding-bottom:10px;
}
.blockquote p {
margin: 0;
padding-top:10px;
}

You can change background colour just replace background color code with yours. If it is Useful or helpful  for you then it will be others so dont hesitate to share and like and comments . or need any help from me most welcome any time just leave your comments or add me on facebook.

Posted at 23:55 |  by Unknown

0 comments:

Friday 12 July 2013

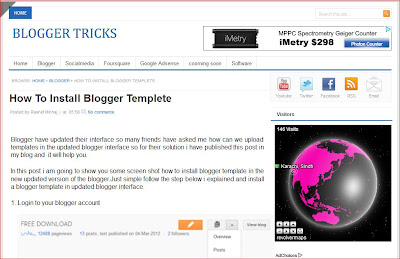
Well  i am sharing with you some thing amazing things. Blogger now changed interface its very simple if you will  install in word press and others then you have to pay money but i am sharing you free of cost Tutorial look my blog picture below you can make to like this.
Well  i am sharing with you some thing amazing things. Blogger now changed interface its very simple if you will  install in word press and others then you have to pay money but i am sharing you free of cost Tutorial look my blog picture above you can make to like this.

Blogger have updated their interface so many friends have asked me how can we upload templates in the updated blogger interface so for their solution i have published this post in my blog and  it will help you. 

In this post i am going to show you some screen shot how to install blogger template in the new updated version of the blogger.Just simple follow the step below i explained and install a blogger template in updated blogger interface.

1. Login to your blogger account


 2. Now just select Template and you can see bellow button at the right hand side.


3. Now just click on backup / restore button and one box will  open in pop up (you can see it in bellow snapshot).


4. Now simply browse your template xml file and click on upload and you have done !
You can also change the arrangement of the widgets using layout. 

Next post will be about where can you get amazing premium template  free of cost.

If you want to learn more subscribe through your email below and must share this post Thanks.....
 

How To Install Blogger Templete

Well  i am sharing with you some thing amazing things. Blogger now changed interface its very simple if you will  install in word press and others then you have to pay money but i am sharing you free of cost Tutorial look my blog picture below you can make to like this.
Well  i am sharing with you some thing amazing things. Blogger now changed interface its very simple if you will  install in word press and others then you have to pay money but i am sharing you free of cost Tutorial look my blog picture above you can make to like this.

Blogger have updated their interface so many friends have asked me how can we upload templates in the updated blogger interface so for their solution i have published this post in my blog and  it will help you. 

In this post i am going to show you some screen shot how to install blogger template in the new updated version of the blogger.Just simple follow the step below i explained and install a blogger template in updated blogger interface.

1. Login to your blogger account


 2. Now just select Template and you can see bellow button at the right hand side.


3. Now just click on backup / restore button and one box will  open in pop up (you can see it in bellow snapshot).


4. Now simply browse your template xml file and click on upload and you have done !
You can also change the arrangement of the widgets using layout. 

Next post will be about where can you get amazing premium template  free of cost.

If you want to learn more subscribe through your email below and must share this post Thanks.....
 

Posted at 06:11 |  by Unknown

0 comments:

About the Author


Rashid Minhaj is a B.Tech Holder in Electronics, He loves to making Blogging and Seo who is working online for last 7 years,he mostly creates blogs, he is managing several blogs.

Protected by Copyscape DMCA Copyright Search

Comments

Blog Archive

© 2013 BLOGGER TRICKS All rights reserved
back to top